Saturday, August 23, 2008

Anyone Got An Onion & Potato Soup Recipe?

So I decided to dig up all the potatoes and red onions today. I was pleased with the amount of stuff.

I picked some rosemary and oregano too.

I made up a batch of roasted taters and onions, and gave a bag to Jane and Dan from work who helped me build and plant the garden this year.

I also picked my carrots. They were a lot smaller than they should be because I did a terrible job of weeding. I definitely learned that I am not a weeder. So for any garden next year, I 'm going to have to really plan out what I'm going to do to minimize the weeding.

So now I'm going to try and make a nice soup with the bag I have left over.

See you next time.

Wednesday, August 20, 2008

Riding Lawnmower Capacity = FAIL

Have you ever wondered how much weight a riding lawnmower could pull up a slight hill? Not as much as you'd think.


It was time to build a new fence line on the property. For longtime readers of the Farmer Ron Blog, you might remember the saga I went through to get a basic survey done so I would know where to put this fence.

The actual property line came in less than 5 feet from my neighbors house. Although I could have put the fence right on the line, it seemed like really bad karma, so we ended up putting it down at the bottom of the little hill his house sets on.


First off, a quick homage to the Cowgirls new F-250. It carried a shocking amount of weight with ease. I had 50 bags of cement and about 1000 lbs of lumber in the back of this thing, and it didn't even hiccup.


Stacking all this stuff was a bit harder when you don't have a fork lift like Home Depot. That'll put a kink in the 38 year old back... Where's that hot tub again?

Next on the agenda was digging post holes. I'm no stranger to the working end of a post hole digger, and after several fence building sessions where my hands ended up feeling like clubs the next day I decided this time I'd rent a post hole digger.

I was super pumped and spend more money to get the Easy Auger that sits on its own trailer. I went to the tool rental the day before and had all my supplies and the auger ready to go. We got through about 1 hole with this and it kept dying on us.


So it was back and forth to the rental place 3 or 4 times, and finally we came back with the Little Beaver - I know, who names these things? This one had an engine on wheels and an umbilical cord that powers the auger. It actually worked just as good. The auger was a few inches smaller in diameter, but it did the job just fine.


After we got the Little Beaver going, it made relatively short work of the 175 feet of fence. Only one problem: Blackberries. While I love whipping up a batch of blackberry jam as much as the next guy, when a giant blackberry plant is in the way of your straight fence line, it's not that fun.
We hit it with a machete this time, but I want to see if I can borrow my neighbors llamas to eat it down.


We then had our little garden tractor incident as described above, dropped all the 4x6 posts into the holes, and called it day.


Next up, we'll be adding the cement, then the pressure treated stretchers, and then finally the 5 foot fencing that I scored at the auction.

See you next time.

Saturday, August 9, 2008

We've Got A Peach!


I really didn't expect anything this year when I bought a close-out peach tree at Wal-Mart for $5.
But my friend Becky noticed that there is, in fact, a peach on the tree... Nice.

Things are looking up for next year!

See you next time~

More Fun With Cherries - Kick Out The Jam...

Well, I got about six pounds of cherries from the back yard to start making cherry wine, and there were still a lot left on the tree. So I figured I'd try my hand at a batch of cherry jam. I had pretty good luck with the blackberry jam last year, so I basically just swapped out cherries for blackberries.

The one main difference I soon realized there was a big difference between cherries and blackberries: pips. It took about an hour or so to get all the pips out. That was a pain in the butt to be honest, but worth it.


Pretty easy recipe. Blast the cherries in the food processor for a few pulses, then put them in a big pot. Make sure it's tall, because when it comes to a boil, it will really expand. Don't ask me how I know that. I don't want to talk about it, but I will say that it takes quite a bit of time to clean molten fruit out of your stove burners... but I digress.

I put about 4 cups of sugar in with a food processor full of cherries. I put in one packet of pectin, and I added about a table spoon or two of lemon juice.

Bring it to a boil for about 90 seconds, and take off the heat.

Another thing I learned last year with the blackberries is that it would be a good idea to put something under the jars to catch the overflow. So now I put some tin foil down. It makes me feel smart about myself when I crumple it up and have clean counters.

I don't do the entire "preserves" process because I take keep a few jars for myself and take the rest to work and give them out.
Always nice to score some brownie point with the co-workers.

This batch turned out a bit thin, I needed to boil off some of the liquid to thicken it up. Next time it should be perfect.

I have to say that on a nice piece of bread, it was really good.

See you next time~

That's a $700 Load Of Crap...

Or manure, as they say in the horse biz. Time to construct our two bin manure composting stalls. For those of you in King County, Washington, there is some good news. If you have a farm plan done, much of the cost of this project will be reimbursed to you by the county. You have to set up an appointment with a Farm Planner at King Conservation District Office. They come to your property and generate the farm plan free of charge. So I've got that going for me.

Here's the link for the plans I used for this project. It was created by our good friends at Clean Water For Horses, so I figured I'd follow those to the letter to make sure I'd get the reimbursement money when we submit our receipts in a few months. The one thing that's not accurate on the plans now is the cost. The plans were made up a few years ago and estimated the cost per bin to be about $200. I spent at least $350 per bin. How bout them oil prices everybody?

Let's start at the beginning.

Picking a site. This advice may seem really obvious, but try and put the bins as close to where the horses live as possible. The shorter the distance, the happier you'll be come December.
I know what you're thinking, "What about the smell?" I'm glad you asked. If you follow the directions on the plans, it really doesn't smell that much. Not as much as you'd think. Just keep things covered and get some air in there.

We also tried to keep in mind that we would need tractor access and truck access to the bins when we will be giving away truck fulls of compost I'm sure.

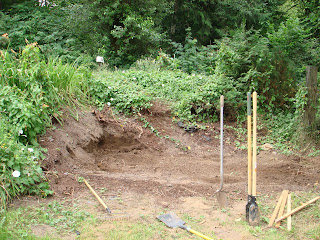
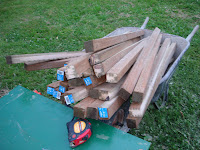
I guess this is the "before" picture, and I put it after the "after" picture. I've gone and spoiled the reveal. Ty Pennington would be so disappointed in me.

We had a giant ugly bush in this spot and a bunch of blackberry bushes. So we paid the local teenager to clear out the area. Then I did a bit of tractor work to level things out and clear the root balls from the bushes.


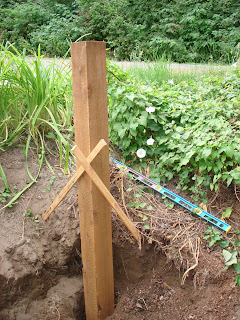
I use the two sticks and 160 lbs of cement routine to make sure the first post was plumb and square. Just pound the sticks in to adjacent sides and use your bubble level. When the bubble says go, drive a screw in there and it should hold it until the cement is poured and dry.

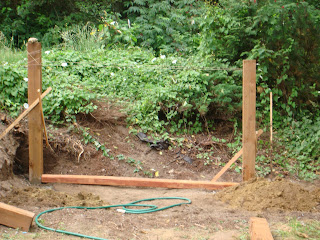
Now you need to take your time in setting the next post. I did not want to have to trim all these landscape timbers, so the posts need to be exactly 8 feet apart.

The way I did this was to just put one of the timbers on the ground and use it as my guide. If your first post is exactly plumb, then the rest will fall into place.

This step is a lot easier when you have two people. Then the partner can hold the cross timber at different heights to make sure the spacing is right.

I'm rambling on forever about this because I found that this was the most important part to making the walls go up easily.

I also used a string to make sure the back three posts were perfectly aligned. Just attach the string to your first post and when it is lying right along the face, that's where the next post face should be.

Once you get all six of your posts in, it's time to make the channels that will accept the landscape timbers.

The plans call for pressure treated 2x2's. Home Depot does not carry PT 2x2's. So I bought PT 2x4's and ripped them in half on the table saw. You get four 4 ft 2x2's out of each board. (By the way, if you haven't worked with dimensional lumber, it won't really be 2 inches by 2 inches because the 2x4 isn't actually 2 inches by 4 inches, it's 1.5 inches by 3.5 inches. Don't ask me why. But just cut the 2x4 in half both ways, and you'll be fine.)

You now create a channel for the timbers to fit into. The plans call for 3 inch deck screws (screws, on the other hand are actually 3 inches long if the box says 3 inches.) The best way we found to do this part was to put up the inside part of the channel on both posts with just 2 screws.

Then you put the landscape timber on the ground, put your level on it, and when it's level, drive a screw from the outside, through the 2x2, and into the timber. That will hold it level while you attach the outside 2x2 that will complete the channel using the timber as your spacer. At this stage, only use 2 screws so the channel can flex a bit when you insert the timbers.

I chose to add some additional screws ever other timber just to tie things together.

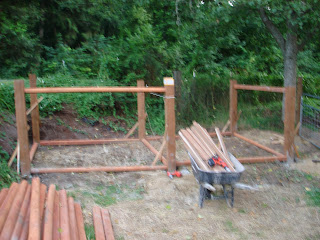
Here's how the first two walls look. I know the posts are higher than the walls, but I think they are right to only go up 4 feet. If you piled up manure all the way to 5 feet, I think that would just be too much to turn and work with later. Four feet seems about right.

Then just finish up all the walls the same way. I put channels to make front walls too. I figured that when one side gets full, we can put some extra timbers in there to keep things contained. I don't know if that will work well, but I had enough 2x2's, so I did it.

I also back filled the wall closest to the hill with gravel. We get a lot of rain in the winter, and I don't want that hillside moving around much.

Now we just need to get some tarps, and we're all set to scoop that poop. I do have to say that this feels like the Taj Mahal of poopers. But it will make the chores a lot more efficient, and the compost will come in handy in the pastures and garden.

And now (drum roll please) here's the Cowgirl with her first dump in the new bins:


See you next time...

Friday, August 8, 2008

Cherry Wine Update... Rack Em!

So I guess I'm officially a Wine-o. My inaugural batch of fruit wine is coming along nicely. If you missed the first part of the process, you can catch it here.

About 2 weeks in, I pulled out the nylon bag of cherries.


Then I waited about five or six days, and racked the wine today.
I had someone ask in the comments section of the blog what "racking" is - so here's the dictionary.com definition; "To drain (wine or cider) from the dregs. "

It's also been described to me as clarifying the wine.

Here we go - the set up for today:


Next I filled my two CLEAN glass one gallon jugs:


And here's what you get:


This is what's left in the bottom of the barrel - it doesn't look too tasty:


So now the jugs will sit in my room for the next few months and I'll re-rack them again for clarity. I'll let you know how they turn out.

~See you next time