Friday, February 29, 2008

Got Me Some DESIGNER Dirt?

So I guess Happy Leap Year? My mom has a friend who was born on a Leap Year Day. She's been retired for years, she says she's 17. Technically, she's right, I guess. But I digress...

So I was putting dirt into my big raised garden planting box, and I saw something that now I'm curious about. I had been putting in the El Cheapo Dirt from the big box store:


It's like $5 for a 30 lb. bag, and I figured that dirt is dirt, so I bought some for my the smaller raised box and when I put it in there - low and behold, it looks like..... wait for it...... DIRT. (Or as you gardeners call it - SOIL.)

Well, everyone must have been thinking the same as me, because the Supersoil was just about sold out, and the more expensive soil was virtually untouched. I got the last bag of Supersoil, and I picked up a couple of bags of the more expensive stuff. It would cost more in gas for me to come back to the store than few bucks difference in price.

So I got a two bags of this Scotts Potting Soil. And I was still thinking Dirt is Dirt. Until i threw them in the box today. (Sing along- One: Put your dirt in the box...)

First off, the Scotts and the Supersoil say they are both 2 cubic feet, but the Supersoil seems much heavier. Second, the texture and color is pretty different, and the Scotts has these white flecks in it.


I don't know if they show up very well, but when you open the bag - you can really see the difference.

The Scotts is much more compacted, but still less dense than the Supersoil. It's also a shade lighter.
(Insert Spinal Tap what's blacker than black joke here.)


It doesn't show up really good, but the Scotts with the white flecks is left of the garden tool, and the Supersoil is on the right. So I flipped the bags over to check the ingredient list. I was ready to call in the Mythbusters and get to the bottom of this, because to a city boy like me: Dirt is Dirt.


So we got the Scotts on the left and the Supersoil on the right. It seems as if Scotts has half the Nitrogen of the Supersoil, 7% and 14% respectively.

So I'm hoping that someone can give me a little insight here. You pay more for less nitrogen? Or pay more for the name Scotts on the bag? I thought nitrogen was good?

Master Gardeners, I'd love to hear your non-technical explanation?

Thanks,

~ron

If you like my blog, please click on an Ad that interests you. Thanks.

Thursday, February 28, 2008

Cheap Skate II - Electric Boogaloo

Speaking of being a cheap skate, I made my first visit to the new Habitat For Humanity Building supply outlet store. It just opened up in South Seattle, and I wanted to see if they had any pressure treated lumber for a big fence project that we're planning.

It's a brand new store, and I have to say they're off to a good start.


While they didn't have exactly what I was looking for, they did have regular 2x4's for $1.75 each... a bit cheaper than the big box stores, and the money is going to a great cause. (Jimmy Carter is far and away the best Ex-President in recent history, but that's another story for another day... I think that Habitat is his crown jewel.) They also had some manufactured decking material in small quantities. So if you had a big job, it probably wouldn't work, but I'm assuming that they'll be getting more stuff in all the time.


I was very surprised and pleased that they had a big inventory of brand new appliances at some pretty good prices. Like this Kitchen Aid wine fridge. It's brand new, and didn't seem to be damaged in any way. I think this one was $800. Below Retail, so a good deal if you were looking for it. They also had fridges by Amana. One Stainless, some black ones, and white as well.
The had a few rows of assembled kitchen cabinets, microwave/vent hood combos, and a lot of toilets by American Standard in the boxes.

There were some pretty high end washers and dryers, we've been thinking of replacing ours, so when I rustle up an extra $250 - $400, I'll definitely be back.

Plenty of doors and windows. In great shape. The store is exceedingly clean, and seems like they are are adding new stuff every day. They also had a lot of interior and exterior paint... mostly from the Martha Stewart Collection... I think that's when she was with K-Mart - so maybe Habitat worked out a deal with them?
There was a bunch of tile flooring adhesive and caulk, and some big boxes of nails an bolts.

So all in all, I have to say that I'm very excited about the new Habitat Store. Great deals and a great cause. If you need things like this, and you're near South Seattle and Hwy 99, check them out.

~ron

If you like my blog, please click on an Ad that interests you. Thanks.

Wednesday, February 27, 2008

One of my Biggest Secrets...

If you ever get the chance to know me I hope you say, "That Ron is a straight shooter, and a hard worker." Or maybe, "He's a funny guy." But I know when I'm out of ear-shot, you'll probably say, "Boy, that guy's a cheap skate!"

And I'm proud of it... =) There's not too many things that make me happier than getting a screaming deal on something that I need to buy.

One of my biggest secrets here in the Puget Sound is Turner Auctions.


They're an auction house down in Fife, WA. They do your standard car auctions once a week, and sometimes you'll find furniture there. But the real score for me has been their building supply auctions. At least once a month, they sell building supplies. And at a huge discount.


Last year, I bought and renovated a house down in Tacoma. I "flipped" it right as the market took a dive (that's another blog for another day...) But I did manage to save quite a bit of money on some nice building supplies at the auction. I scored these solid granite counter tops at Turner Auctions for $150 a piece. That's two 8 foot sections and a 3'x6' kitchen island top with finished edges and a 4" backsplash for $450. Try and beat that price!

Turned out pretty nice if I do say so myself. I also got that terra cotta tile at the auction.


I absolutely STOLE this high end Spanish tile at the auction. It retails for about $12-$15 per square foot, and I got and entire pallet for around $100... SCORE! This shower turned out amazing.


I also got that solid Mahagony floor for an amazing price. About $275 for the entire living room. It's not laminated either, it's solid wood. It would easily be $10/sq. foot at a retail store.


More in line with this farm blog, I found a half pallet of pressure treated 2x4's there that I picked up for $50. If you've bought any pressure treated wood lately, you know what a deal that is. I had enough wood to do the stairs in the front and the back of the house, and had enough left over for all the stretchers on a cedar fence I put up in the back yard. Saved hundreds of dollars on that buy alone.

I've also got some horse fencing at the auction. Five foot and six foot heights.

So if you're a cheap skate like me. Or as my mom would say: frugal, you owe it to yourself to check out your local auction.... just don't bid it up against me!!!

~ron

If you like my blog, please click on an Ad that interests you. Thanks.

Tuesday, February 26, 2008

Do I Need A 2nd Mortgage to Afford A Survey?

So we are looking to put in a new fence to keep the ponies in, and we're not totally confident with where the current fence is in relation to our actual property line. So we're thinking we can just get a quick survey to confirm the proper boundary line.

We want to put in about 600-700 feet of fence between us and the neighbors. So it seems like that would be a pretty easy job...

So I started calling around this morning to some survey companies that the wetland engineer we used recommended to me. The first person that I actually
got on the phone said they charge $155/hr with a 4 hour minimum. Say WHAT (with googly eyes and shocked looked)???? You mean to tell me it will cost $620 to have a guy tell me where I can put my fence?

Now I don't want to disparage another person's profession, and to be honest, I don't know exactly everything that involved with doing a survey, but $620 to say, "Yep that's the line." Or, "The line is 5 feet over that way." Are you kidding me? I've been told these guys all work by GPS now. So all they have to do is find the surveying monument about half a block down the road and put that in their GPS machine then walk down to our property line.

What am I missing here? I understand if you're preparing a site for a building and need to do a complete survey for building permits that you can spend a day or two doing the job. But just to find a boundary line? That's crazy.


The second guy I talked to said they were $140/hr but it "Would take at least a day..." $1160? As my dad would say, "This is highway robbery."

The third of the big time survey companies finally gave me a contact of a guy out of Kirkland WA that supposedly does "Small Boundary Jobs." I hope when I get his bid, that it will be a "Small Boundary Price."

All this just to start paying for the fence to do in. I'm holding my breath, because the fence bids start tomorrow morning.

The fence will be going right on the other side of that pasture. About 100 feet or so from the horse stalls.

~ron


If you like my blog, please click on an Ad that interests you. Thanks.

Sunday, February 24, 2008

Buying a Tractor - When You Know Nothing About Tractors...

So after about 7 months on the farm we began to say to ourselves, "We need a tractor."
And since I knew absolutely nothing about Tractors, I started by going on the internet, and after a few hours of research, I was more confused that before I started.

So my next step was to go to the Kubota Dealer in Issaquah, WA.
I looked at a few tractors there, and the salesman was very nice and informative.
I thought if I went new, I was going to buy a 20-24 horse power tractor with the front end loader...something close to this:

But without the back-hoe.

After looking at that, and a Chinese Tractor, and the New Holland, I decided that for what I need to do around the farm, that spending $16,000 was a bit too much. It's hard though, I definitely got caught up in tractor fever at the dealer.

So I started looking on Craigslist.
I went out and looked at a 23 horsepower Kubota, and offered to buy it, then the man got cold feet and decided not to sell it to me.

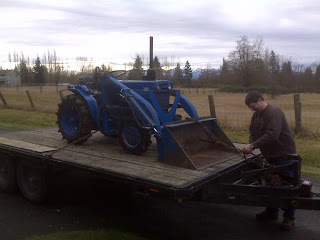
Then I found a 19 horse Mitsubishi with a front end loader for $4600.

It only had 490 hours on it. Yes tractors are like boats, you measure them not by miles, but hours. So this tractor is from the early '90s and 490 hours is very low. The man I bought it from seemed to take very good care of it. (You can always tell when someone keeps their garage really clean, that it's probably a good sign.)

I decided to pull the trigger on it, and it seemed like I was getting a good deal for a tractor with a loader for under 5 grand.


It was pretty easy loading it onto my friend Doug's flatbed trailer.
Getting it off was another story. It was the first time in my life I had ever driven a tractor and I was trying to back it up on two boards that seemed to be about the size of pencils as I was looking back at them. I was sure it was going to fall off the trailer, but we finally managed to get it off.


So here it is in front of the barn. So far it's done everything I need it to do. We're looking at getting a post hole digger attachment for the back. They seem to run about $500-$600. We'd also like to get a box blade and a brush hog eventually.


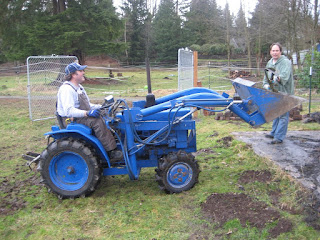
Here it is in action... I'm not that good at scooping things up yet, but I'm getting the hang of forward and reverse. And moving the bucket up and down.


Moving a little cargo to the back.


Here's The Cowgirl trying out the new ride. I figure that we'll see if it will do everything we need it to do. If not, it doesn't seem like they lose their resale value very much, and I figure that I can upgrade if I find that I'm constantly struggling to get things done. But so far, it seems like it's working out fine.

So I ended up spending about 1/3 the price of buying a new one, we'll see if it was a good buy.

See you on the farm
~ron


If you like my blog, please click on an Ad that interests you. Thanks.

As Peter Gabriel would say, "Diggin In The Dirt..."


Time to put the dirt in the raised flower beds.
Actually I didn't know how much dirt I'd need, so I bought four 30lb. bags.

Man, they feel heavier than 30 pounds. Must be the awkward shape. Anyway, I also got some seeds and some bamboo things for the climbers to climb on.


That's what one bag looks like.
Click here if you want to see how we made the raised beds.


Pretty simple stuff here, just spread it out. Took 90 pounds of dirt to fill the 4 foot sqare box. So I'll need about 5 more bags to fill the 8 foot box.
Look at me doing math.... Sally leaves Chicago in a train going 70 miles per hour, while Bobby leaves Los Angeles ....


The Square Foot Gardener says to mark your squares some how. I'm going to try this twine and see if it holds up.


So that's how it looks all done. Sixteen squares. This smaller box is going to be for herbs only. I don't know if there's even 16 different kinds of herbs I want to plant, so I may double up on some. Mint Juleps here I come!


While I was at it, I added a few little shelves under 2 of the sawhorses. I figure it'll be a nice place for some odds and ends.

That's it for now. Time to call in my master gardener friend Jane for a little visit/lesson.

I'll keep you posted when we plant.

~rancher ron


If you like my blog, please click on an Ad that interests you. Thanks.

Installing a gate on the Raised Garden...

Another busy weekend on the Farm. I needed to install a new gate to have access to the raised garden. Click here to see the post about building a raised garden.


Here's the "before" pic. The Cowgirl wants to use those old scaffolds as a make shift arbor to walk under when you open the gate and put a climbing vine on it. Should look good. For now I just connected the two scaffolds with 4 pieces of 2x4. I drilled a few holes that fit onto the pegs where the X braces would have gone.


Here's the gate that I'm going to install. I thought about getting a wood one, but that would block the sunlight on plants that are going to be behind the gate. It's your basic Lowe's special. It was like $30, plus you have to buy all the hardware a-la carte.


Here's all the stuff to do the job. I got the hinges that go into wood, and two brackets, and the latch. Obviously the drill and the tape measure are needed.


Mistake #1 - I can never seem to get through an entire project without messing up a few times. I put a regular drill bit into my drill, and I was rocking it around to enlarge the hole, and the drill bit broke off inside the hole... oopse!


So I got out the 1/2 inch paddle bit that I should have used in the first place, and drilled a second hole cause I couldn't get the old broken bit out.


So there you go. Now if you're ever over, you can point at the extra hole, and laugh at me.


Here's a cool trick of the trade that I picked up somewhere. Get a big adjustable wrench or box wrench, or a piece of pipe will work good too. Get the screw bracket started by hand till it bites, then use the leverage of the wrench as a handle to turn it. Works great, and it's a million times easier than trying to turn that bracket after it's in an inch or two.


Here's both hinge brackets installed. When I did my first gate, I though that both pins should be facing up and you would just drop the gate on there. But the reverse is also true, someone could walk up and just take the gate off.
So the correct way is to have them facing each other. Put the bottom bracket on first, then tighten the top one to the hinge, not the other way around.


MISTAKE #2: I bought the square head bolts that were right next to the gate hardware, and they are not long enough to go through the hinge.


My first fix attempt was to bend the metal bracket with a C-Clamp until it was close enough to get the bolt through. Didn't work.


I dug through the old pile of spare hardware and happened to have a few longer bolts and nuts. Score! No extra trips back to the hardware store.


SUCCESS IS MINE!


Just put them on the hinge, and tighten it down. That part is done.


Now I put the latch on. But I knew that the latch would not fit on the wood 4x4. I saw a trick that a framer did one time on a tv show, so I thought I'd try it out.


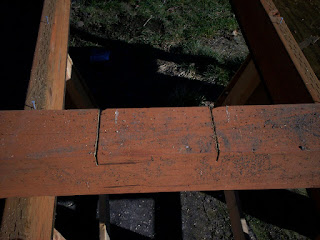
Set your skill saw to 3/4 of an inch and make two cuts to mark the top and bottom of the material you want to take out.


Now just make cuts every half inch or so. Also I found the height of where this needed to be cut by first digging the hole and then marking it with the latch.


Next take a chisel or a screwdriver and the wood will pop right out. If your wood is nice and dry that help out. Sometimes the 4x4's are really wet. This technique doesn't work as well with the wet wood.


Nothing to it...


Clean it up a bit with the chisel. I did both sides 3/4 of an inch.


Here's a shot of the post hole. I just used some 3/8" minus and tamp it down with a tamp bar.


Some people call them pry bars... but this one has the tamper on the other end.


I use the Porter Cable nail gun with 1" galvanized staples in it to attach the fence to the posts...


And there you go... Done deal.

See you on the farm.
~ron


If you like my blog, please click on an Ad that interests you. Thanks.