Wednesday, March 26, 2008

Snow Day... Did He Just Say "SNOW?"

We're only five days from April, but we got our April Fools joke early here. Snow outside Seattle on March 26th. I know if you live in the Midwest, this probably isn't a big deal. But people freak out here in Seattle when we get snow in December, let alone March.

I just spent about $80 on some plants for the garden last weekend.

[Click here to see the new planter boxes for strawberries]

So I was not too pleased to see the snow hitting my windshield on the way home from work tonight. Luckily I just bought some empty pots from Big Lots to cover up my strawberry plants because it's been pretty cold this week. I hope it's enough to keep everyone alive.

I don't know if this will be enough to combat the snow, but we'll see. I'd hate to have wasted all that money on plants, but I guess that's the risk you take when you plant early.


See you next time.

~ron

Tuesday, March 25, 2008

Stringing Electric Fence In The Rain? Smart.

So it was Easter Sunday, and after the family brunch, it was our only day of the week to get the electric fence tape strung... but it happened to be raining. So out we went into the pasture because this is the Puget Sound, we're use to rain.
[Click here for the history of the fencing project]

[Click here for part two of the back story...]

We got the extra wide tape, and some fence splicer clips - more on that later, and started to go. I was trying to avoid just tying knots in the end of the strands, I think that looks kind of unprofessional, but there's really no way around it. At a termination point, it's really the best way to secure it to the clip.

One other side note: when we first started, I assumed that you attach the end of the tape to the charging unit, but I was wrong. You just terminate it near the charging box and then run a wire from the box to the top wire... glad I read the instructions for a change.

We ran just the one tape from our barn (where the electric outlet is) to the corner of what will be the pasture area, then it will go to three strands. Again, you run a jumper wire from strand to strand to electrify it. We will also need to install the grounding rods here soon.

Here's how our termination point looks by the barn. We bought some little brackets that we'll use when it's time to attach the live wire to the tape. That will happen next time.

We got up the top two strands before our hands started to freeze, and we were running out of tape. We need to buy a few more rolls to finish things up.

A quick word about these splicing clips.
They're kind of like those horse shoe puzzles where you try to get the ring out. It only took two of us about 20 minutes of staring at the thing and then looking at the illustration on the back of the package to figure it out. But once we did, they seem to be working like a charm.


Herb the goat approved. And as Murphy's Law dictates, as soon as we went inside, the sun came out.


And Squid the Horse is ready for us to be done so she can go out and graze.

See you next time when we will hopefully juice this thing up.

~ron

Monday, March 24, 2008

Be Careful What You Wish For... Adventures In Property Lines...


You know the old saying, "Be careful what you wish for, lest it come true." Well, I wanted to get a survey done so that I could claim some of the land that is by my neighbors to the west, and as it turned out, I will recapture about 6400 square feet - so I think that part of the mission was wildly successful. You can see how close they built the house to the property line... wow.

[Click here for the first part of my survey adventure]

[Click here for the second post on surveys]

[Click here for part 3 in this made for TV special mini-series]

So my neighbor to the east had been wanting to get his property surveyed too for the border on the other side of his property, so we decided to do them at the same time since we share a border line.

The line that we share came back in his favor. We went out together this weekend to see how much of my access road creeps onto his property. He wants to build a fence to keep his Llamas from getting out (a habit they've gotten into as of late.)

Here's a pic looking down our access road right at the line.
I don't know if you can see that little post in the distance, we just stretched some twine from the corner post at the road to that post and continued. It's not too bad at this point, only a few feet.

But back at the horizon the road curves to the right for about 50 yards or so and it's definitely on his side of the line, and it would be a major undertaking to re-route the road back there.


So we'll see how it develops. Our survey guy said we could write up an official easement document (for a few hundred bucks extra, of course.) That might be a possibility to solve the issue and get it on the record. At this point, at least now everyone knows where the lines are drawn.

I am pretty amazed that the lines are that close. The original survey was done before GPS, and they got it within a few feet out here in what must have been very rugged country at the time. Nice job Lewis & Clark.

See you next time
~ron

Saturday, March 22, 2008

The Elusive Frank The Dog...

Frankie is a bit camera shy, but I got him on video out back today.
I called him Frank because he's got bright blue eyes...


~ron

HGTV... I'm ready for your call =)

Before:


After:
The front of house was looking pretty bad, so I figured that it was time to spruce things up a bit. This whole project cost me about $80 (not including the two planter boxes or the bricks...or the blue pot - IKEA!)

[Click here to see how I made the planter boxes]

First thing was to clear out the weeds/grass.
Nothing exciting here, just shovel it up and keep what you can.

This area took me about an hour or so to clean up. I put down some landscaping tarp next to hopefully keep any weeds from coming back.

I don't want to be doing that job again any time soon. It really is not that much fun.

Quick lunch break (Mongolian beef and egg drop soup across from the hardware store...) I picked up 4 bags of potters soil and 5 bags of beauty bark, plus all the plants...more on that later.

Just dumped 4 bags of bark in and dropped the boxes in there to make sure everything fit. I ended up propping up the boxes on bricks to make sure it would have good drainage.

I needed some dirt to fill these up about half way. It was just too expensive to do the entire boxes with all potting soil. So I fired up Ol' Blue and got a bucket full out in the back 40. I also scored a wheel barrow full of Llama compost from my neighbor. Those berries should be loving that.


I ended up putting in 4 strawberry plants and a bunch of $0.99 flowers to fill everything up.


I hope I'm not putting them in too soon. I asked the garden woman at the hardware store, and she said I had the green light. They were keeping these plants outside there, so I figured it would be OK.

Here's how the little buggers look planted. I can't wait for some fresh strawberries. Should be fun.

I also planted some raspberries in the back garden as well as some rosemary, oregano, and chives.


Any tips from you master gardeners would be much appreciated!

Thanks

~ron

It's Electric, At Least It Will Be Soon...


I'm talking about our new horse fence system. We got some hot wire for the ponies, and I have to say it's been quite a little project.

First step was to put in the T-Posts. We got 80 posts from Home Depot for a little under $400.

[Click here to see the first part of this project...]

So next, we got the hot tape and all the accessories for that at our Ranch store for another $400.

I needed to install the tape charger box. We had an outlet installed in the barn for this purpose, and I put the box on the exterior wall with a little cover over it just in case. It's under an over hang, and obviously the electrical connections should not get wet.


I know that looks ridiculous, but I just wanted to make sure... it's kind of a "belt and suspenders" approach. You may have heard, it rains a bit up here in the Seattle area.

This box was less than $50, and is rated for up to 3 miles of tape. That sounds like a lot, but the thing I didn't realize at first is that we have three lines on each pole. So it's what ever your distance is times 3 in our case. We should still be well under 3 miles.


Next up, we had to install the insulators that the tape will go in. We needed two kinds: one to screw into wood, and one that clips on to the t-posts. These are the ones we used to screw into the wall. It's a pretty simple concept. Don't let the electric tape touch anything but the insulators.

That's how they look installed. You just feed the tape through and click it closed. One note on termination points. I've seen people just tie an knot in a termination point, and I think that looks terrible, so we got some metal connectors to make it look a bit more pro when we install the tape.

These little buggers were kind of hard to install. Not hard in that I didn't know how to install them, that's very obvious. Hard in the sense that you really have to put some elbow grease into it. My thumbs were sore for two days. And since there's three on every t-post, there's just no easy way around it.

So I have the three clips on every post, and in the corners we used a round insulator attached with baling wire because the guy at the ranch store told us to. I guess they get a lot more torque on the corner ones.

Next time we'll string the tape, pound in the ground rods, and connect the juice.

Talk to you soon.

~ron

I Fought The Hose, and I Won...

The problem with being cheap is that sometimes you have to do stuff twice to get the desired result, therefore losing the benefit of being cheap in the first place. Such is the case with my first attempt at fixing our damaged hose. I went with the $1.87 repair kit, and completely failed.

[Click here to read the sad story of hose repair: attempt #1]

So it's on to my second chance. This time I stepped up and spent $4 on the brass hose repair kit.

After the screwdriver slipped and took a chunk out of my middle finger, I thought I'd just cut the old one off.

I trimmed each side of the hose just to make sure I didn't damage anything with the cheap kit. I really screwed down on that thing as hard as I could the last time to try and get it water tight, but to no avail.

Since I was so easily defeated last time, I decided to wrap the brass fitting in Teflon tape. I really don't know if this did anything, but I figured that it couldn't hurt.

You just put the clamps on each end of the hose first, then shove this thing into each side. It took a bit of force to get it seated all the way down, but that's a good thing,

Then just tighten up the clamps, cross my fingers, and turn the water on.... The suspense was pretty thick as I rounded the well house to see if it worked...
In the words of Napoleon Dynamite, "Yes!"
It was water tight. No need to spend $40 on a new hose. That started my Saturday off right.

~ron

Sunday, March 16, 2008

Finally Got To Plant Something!

Very exciting day on the Ranch... finally did some planting. My co-worker Jane came over to give me some pointers, since this is my first garden. It was nice having her show me what to do. I did want to finalize the layout of my garden area, and put the fence up. We have llamas next door, and deer and elk around here, and I don't want to lose all my hard work to them.

I put down some landscaping fabric so that I won't have any grass or weeds inside the planting area. Almost everything is going to be in containers or raised beds.

[Click here to see how I made the raised beds.]

[Click here for part two, the soil and making the squares.]

I trimmed off some of the fabric to make it fit, and me and Jane started installing the 5 foot fence
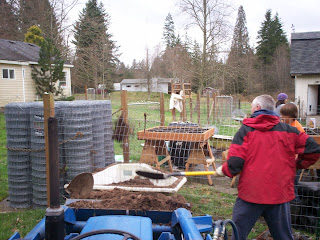
. This heavy gauge fence is a bear to install. We did our best, but it's really hard to get it to be really tight in this type of setting.

I used my compressor and staple gun to attach it to the wood posts, and the standard metal clasps for the t-posts in the middle.


Here how it looks with the fencing in. Oh, by the way, I'm going to put down some river rock over the landscape paper this week to dress it up a bit. I just don't want to have to mow or get the weed whacker out around all those containers. I think the river rock will look great. I thought about bark, but it seems like you'd have to replace that stuff every year.

First thing Jane wanted us to completely ignore the raised boxes, and dig a trench along the fence line on the north side to plant some snap peas.

We dug out about six feet by one foot and tossed the grass off to the side. I just raked it out and we were ready to plant some peas.


We broke from the strictness of the Square Foot Garden book. We planted more seeds than he suggested, but I trust Jane on this one. She knows this area.


We just randomly scattered the snap peas over about 3 feet, and the other style of peas over the other 3 feet. We pushed the down about an inch and a half, and lightly covered them with soil.


Gerty the dog thinks this is not as much fun as chasing things or playing fetch.


Next up, we got this old bath tub that had been out in the field in place on some bricks to make sure it would drain right. Man, those old cast iron bath tubs are HEAVY! It took us 3 people and a hand truck to get that thing in place. I put about 3 bags of top soil in there, and then my neighbor Bill brought over some of his special llama compost, and Jane went wild over this stuff.

There are a bunch of worms in there, and we just tossed the whole lot in, and mixed it up really good with our hands and some hand tools. Jane was going on and on about how great this stuff was going to be for our potatoes. That's what we're putting in the tub.

First up is some purple ones. Jane brought these over. She said you want to cut them into a few pieces, making sure that each piece has an eye that developing. That's the part that will sprout.


We just chopped up several different varieties of potatoes and put them about 4-6 inches down in the soil and covered them up. Jane added another half bag of soil on top of those and mixed in some red onion seeds as well in this tub planter.


Jane had never driven a tractor, and we needed some dirt to fill up the other tubs we had. That was all the excuse we needed to fire up Ol' Blue and get rolling. Neighbor Bill and his nephews came along for the ride.


We shoveled in the dirt, added some potting soil and llama compost, and those tubs are just going to sit for a while until it's hot enough to plant tomatoes in there.

That tractor can drive a bit wonky with a bucket full of dirt. We had a few seconds when one of the wheels came off the ground. I'm going to look into what it would take to put a roll bar on this thing.


The only other thing Jane said we could plant right now was some spinach and some romaine lettuce. I did the spinach into three squares, and followed the Square Foot Rules on this one. Just one seed in each hole. I did 9 seeds in each square. That'll probably be a lot of spinach, but I guess I can give some away if it all comes in.


In a few weeks, or at the latest a month from now, I'm going to plant my herbs, and a lot of the other veggies.

I'm also going to have a giant pumpkin contest with my brother. He bought some seeds for his place down in New Mexico, and I bought a pack up here. I'm going to put them in down by the well house in a few weeks, and see who gets the bigger pumpkin at the end of the year.

See you next time.

~ron