If you're a horse person, then you know all about cribbing. I thought it was a reference to a Snoop Dogg song, but it's actually the nasty habit of horses chewing on the wood in their stall. Here's a good article on answers.com about it.
So only after a few months, this is what the center post of the brand new horse shelter looked like:
They make several wood treatments for this (this one is called Bitter Licks), and we bought some. It was too cold for it to dry properly, so I had to take matters into my own hands.
After wandering around Lowes for half an hour or so, I stumbled upon some metal roof flashing.
 It's like $0.79 per sheet, and the nails were another $2.50. So I was in it about $10 to start. If you can't tell - I'm a cheap skate. So on these kind of repairs, I always go with the cheapest fix first.
I started the install and put one "L" piece on to cover the chewing, and the second piece would have been a bit too long, so I had to trim the metal. I had just bought a pneumatic metal shears (I got the Central Pneumatic In Line Shear at Harbor Freight), and this was the first time I got to use it.

So I plugged in the compressor and away we went. [Side note: on air tools... when I first started using them, it always says "Oil Daily" on the device, and for the life of me I couldn't figure out where to put the oil. I looked for a little reservoir like in your car or something, but finally someone told me to just put some pneumatic oil right into the air connector before you plug the hose in. Works like a charm, and I haven't had a frozen tool since. Probably a no brainer for construction people, but it was a major revelation for me.]
 Worked like a charm. The shears made a really nice straight cut. I was really impressed. I don't think it would work well on really heavy guage sheet metal, but for this flashing type, it worked great. I also tried to use them on some of the roofing on the horse stall, and they did not go through the ridges well at all. I bought some regular hand shears for that.
Note on the install: when I had the two layers of flashing overlapping, it was impossible to get the flashing nail through without bending. So I got a regular framing nail, and did a pilot hole - that saved a lot of four letter words and wasted nails.
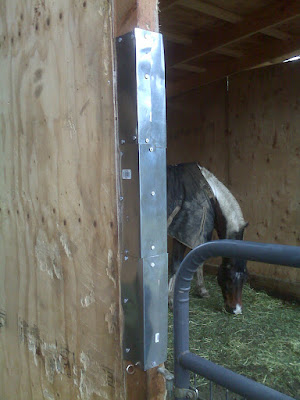
Here's how it looks finished:

Turned out ok, but Squid took a bit of fur off her muzzle on one of the edges, so I got some flashing tape that has rubber on one side and metal on the other and put it over the seams to cover the sharp edges. We'll see if it's a good long term fix, or if i'll need to do a bigger repair. I guess I could always put up a metal pole on the each side of the post or something, but for now I'm hoping that this keeps the ponies from cribbing.
(Cain the horse thinks it'll work...)

See you next time
~ron
If you like my blog, please click on an Ad that interests you. Thanks.
